How to dam a web site

Whether you are seeking to defend your youngsters from sketchy web sites or defend your self from distracting websites whereas working, generally all of us want to dam a web site for our greatest pursuits. Balancing privateness, freedom, and controls could be difficult to navigate.
While many laptops include some parental controls already put in, some are extra user-friendly than others. We’ll stroll you thru precisely use the settings and use host recordsdata and routers to do that.

How to dam web sites with parental controls in Windows
Windows has built-in parental controls that you need to use, making it simple to dam what you do not wish to be accessible in your system. If you discover that you really want extra options, we have outlined the best free parental control software.
Step 1: In Windows, you may allow parental controls on little one accounts. If your system does not have a kind of, you may set it up by navigating to Settings > Accounts > Family, after which choosing Add somebody. Follow the on-screen directions, and when you may have a baby account setup, proceed with the steps under.
The navigation is barely totally different on Windows 10, however you may nonetheless discover all you want within the Accounts part of the Settings menu.
Step 2: Navigate to your Microsoft account page. Under your kid’s account, click on Overview. Then choose the Content Filters tab on the precise.
Step 3: Under the Web and Search tab, and throughout the Filter Settings part, you may have a couple of choices in the case of blocking web sites: You can toggle on the Only Use Allowed Websites possibility, which suggests your little one can solely go to web sites you’ve got listed within the Allowed Sites part. If you select to depart this selection off, nonetheless, you may nonetheless create lists of allowed and blocked web sites.
To add web sites to a listing of allowed content material, navigate to the *Allowed Sites *part and enter within the web sites you wish to enable, then click on the plus-sign icon so as to add them. You can do the identical with blocking web sites too: Just navigate to the Blocked Sites part and enter within the URLs of the websites you wish to block and click on the plus-sign icon.

How to dam web sites with parental controls in macOS
Windows is not the one working system that permits you to monitor your kid’s actions on-line. On macOS, it is referred to as Screen Time. Here, you are able to do a variety of issues, together with setting limits on how lengthy you might be allowed to make use of sure apps or websites, blocking sure web sites outright, and viewing analytics in your display time habits.
Step 1: Open System Preferences and click on the button labeled Screen Time.
Step 2: If you haven’t turned on Screen Time earlier than, you’ll have to achieve this now to proceed. Next, it would be best to choose the profile it would be best to alter. All the customers on that Mac ought to present up in case you’re the admin, and any consumer related to your Family Sharing account ought to seem right here as properly. Select which consumer you need from the drop-down menu within the top-left nook.
Step 3: Click the Content & Privacy button on the underside left of the menu. Here, you may alter a lot of issues, however search for the part labeled Web Content. There are three choices right here. Unrestricted Access is strictly what it feels like, so it would be best to choose Limit Adult Websites. This will mechanically filter out essentially the most unseemly web sites, however you may add any further web sites by clicking the plus signal that seems.
Step 4: If you actually wish to management what the consumer sees, choose the Allowed Websites Only possibility. That means the consumer will solely be capable to use websites you approve of. Click Customize and add all of the websites you approve of, and the consumer might be blocked from the rest.
Block web sites utilizing the Hosts file on Windows
Blocking particular web sites in Windows is kid’s play — and normally child-proof. It’s utterly free, does not require any further software program, and takes a couple of fast alterations to the Windows Hosts file in your laptop. The Hosts file, a plain textual content file your working system makes use of for mapping IP addresses and hostnames, can be utilized to redirect a site identify again to the native laptop, basically blocking the specified web site. It’s a good way to limit customers from seeing content material you don’t need them to see, whatever the browser and the time of day.
However, remember that you should have administrator privileges to vary the file, and it may be just a little technical. You can all the time undo the change if want be, however the course of is a bit more hands-on than the Windows and MacOS parental controls.
Step 1: Type “Notepad” into the desktop search bar after which right-click the app that seems. Then choose Run As Administrator and click on Yes. Then navigate to the host file by selecting File > Open and finding the file by means of that window. Navigate by means of to the Hosts file by going by means of C: > Windows > System32 > Drivers *> *Etc. You might have to pick out All Files from the drop-down file format menu in that very same File Explorer window.
Step 2: Open the Hosts file.
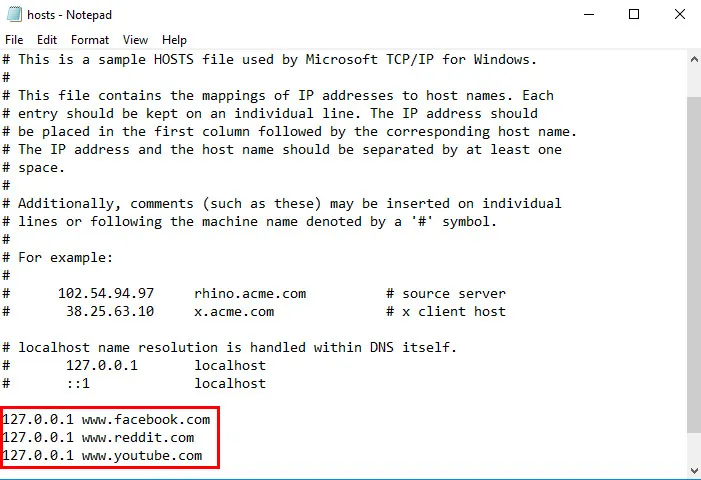
Step 3: In Notepad, you will note a number of traces of textual content used for mapping functions. Underneath the final line of textual content — it ought to say one thing concerning a neighborhood host — enter 127.0.0.1 and press the spacebar. Next, kind the net handle of the web site you wish to block on the identical line. For instance, kind 127.0.0.1 www.youtube.com to dam all site visitors from the favored video-sharing web site.
Step 4: Continue so as to add web sites you want to block on this method, every starting with 127.0.0.1. adopted by an area and the suitable web site. Make positive solely to make use of “www” and keep away from including “http” except you wish to render the entry invalid. Do not alter some other textual content within the Hosts file.
Step 5: Once you’ve got added the websites you wish to block, click on the File possibility within the upper-left nook, select Save — don’t change the identify or save location — and ignore any warnings concerning enhancing the hosts file. Then shut Notepad when completed.
Step 6: Open your favourite browser and check the outcomes! You ought to mechanically get a clean web page everytime you try and entry any of the websites in your blocked checklist. You could need to restart your browser and wait a number of minutes for the modifications to take impact.

Block web sites utilizing the Hosts file on macOS
Blocking web sites utilizing macOS works equally to blocking them utilizing Windows. The course of is free, comparatively fast, and requires altering your Mac’s hosts file to redirect a specified area identify. It’s a easy course of that can stop customers from seeing content material you deem block-worthy throughout browsers, however one that may be reversed if you wish to grant entry to the websites sooner or later.
Step 1: Launch Terminal by accessing the principle functions folder, clicking Utilities, and choosing this system from the ensuing checklist. You may also achieve this by trying to find this system in Spotlight.
Step 2: Now it is time to make a replica of the hosts file simply in case one thing goes awry. Type sudo /bin/cp /and so forth/hosts /and so forth/hosts-original on the Terminal command line to make a backup of the file in query. Hit Enter and sort in your administrative password when prompted. It could seem as if the keystrokes aren’t being registered correctly — i.e., your cursor will not transfer — however relaxation assured that they’re.
Step 3: Type sudo nano /and so forth/hosts and hit Enter on the Terminal command line to open up your hosts file in a nano field. Then, enter your administrative password when prompted.
Step 4: Once the hosts file is opened, you will note a number of traces of textual content used for mapping functions. Underneath the final line of textual content — it ought to say one thing concerning a neighborhood host — enter 127.0.0.1 and press the spacebar. Next, kind the net handle of the web site you wish to block on the identical line. For instance, kind 127.0.0.1 www.youtube.com to dam all site visitors from the favored video-sharing web site.
Step 5: Continue so as to add web sites you want to block on this method, every starting with 127.0.0.1. adopted by an area and the suitable web site. Ensure that you just solely use “www” and keep away from including “http” except you wish to render the entry invalid, and don’t alter some other textual content within the hosts file.
Step 6: When completed, maintain down the Control key and press O to avoid wasting the modifications. Then maintain down the Control key and press X to exit the hosts file.
Step 7: Next, kind sudo dscacheutil -flushcache and press Enter once more to flush your present cache and put the modifications into impact. Alternatively, you may restart your laptop.
Once you are again up and operating, open your favourite browser and check the outcomes! You ought to mechanically get a clean web page everytime you try and entry any of the websites in your blocked checklist.
How to dam web sites utilizing browser extensions
There are a variety of browser extensions for all of the big-name browsers that make it handy to dam web sites with some further management. Here’s how.
Step 1: Open up your favourite browser and search in its extensions for a web site blocker. For this instance we’ll be utilizing the Chrome browser and Web Site Blocker extension, as a result of it is well-reviewed and free.
Step 2: Select Add to Chrome and ensure your selection if requested.
Step 3: Select the extensions button within the top-right nook of your browser window, then choose Web Site Blocker.
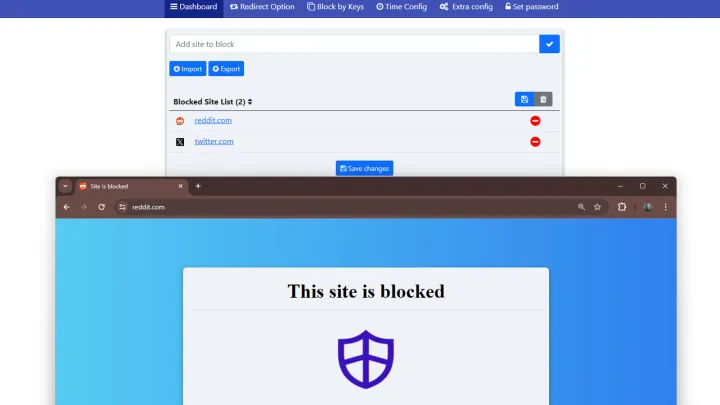
Step 4: Select the Dashboard on the prime of the display, then kind within the URLs of internet sites you wish to block and choose the tick icon.
Step 5: Those web sites will now be unreachable and can as an alternative say, “This site is blocked” whenever you attempt to navigate there.
Step 6: For extra nuance, you need to use the Redirect possibility setting to redirect you to a special web site if most popular. Alternatively, you need to use Time config to set the websites to be blocked solely at sure occasions of day or on sure days of the week, or set a password so you will get previous the block if needed.
Block web sites utilizing your router’s settings
Blocking all customers, always, on all browsers can take a while utilizing the above strategies. Fortunately, your router does not require any exterior software program and is one other unbelievable device that can grant you networkwide management over the blocking course of. Although we can not assure your router can block specified web sites, most routers are outfitted with some parental controls for limiting web site entry utterly, throughout sure days of the week, and even throughout outlined hours.
Step 1: Open the net interface in your router. As a common rule, you may acquire entry to your router in case you enter 192.168.1.1 in your browser’s handle bar. Next, you’ll must enter a username and a password, however the defaults can range based mostly on the router.
If you’re undecided entry your router, verify the label on the system itself for the username and password. You may also verify the instruction handbook for that data, together with the default IP handle. If the knowledge is unavailable, strive wanting up the router’s defaults at routerpasswords.com or cirt.net.
Step 2: Find your router’s safety window that has choices for blocking content material. You’ll need to do some snooping round to determine the suitable settings, however many producers label safety menu gadgets as Access Restrictions or Content Filtering.
Step 3: After you discover the precise window, you’ll be capable to kind in or copy and paste all the web site addresses you wish to block. You is perhaps offered with additional choices to limit the web site additional by means of different means. Make positive to click on save and apply earlier than closing out the tab.
Blocking a web site isn’t tough, whether or not you’re making an attempt to ban inappropriate content material or simply making an attempt to maintain your self targeted on the duty at hand. You can unite a triad of your router, host file alterations, and parental controls to successfully block hazardous web sites or inappropriate content material.