How to alter the place screenshots are saved on a Mac

With the right keyboard shortcuts, taking a screenshot on a Mac may be very simple — though they do not at all times save to the precise location. Fortunately, there are a selection of areas you possibly can select from and choosing from them is as fast and simple as taking a screenshot within the first place.
Here’s how to decide on the place screenshots are savedon a Mac.
How to alter the place screenshots are saved on a Mac
The “Command + Shift + 5” technique will open the full-screen seize panel in your Mac. This defaults to a big seize window referred to as Screenshot that you could alter on your screenshot and a number of other modes under that may change what sort of seize you need. You can select to seize the entire display screen, a particular window of an app (normally for bigger Mac display screen), or a personalized portion of the whole display screen, together with video seize choices.
What isn’t clear is methods to change the place that screenshot saves to. Here’s what to do:
Step 1: Press Command + Shift + 5 to open the Screenshot seize panel and get began.
Step 2: Look on the Screenshot panel controls on the backside of your display screen. At the precise finish, you need to see a button referred to as Options. Select it to open a pop-up menu.
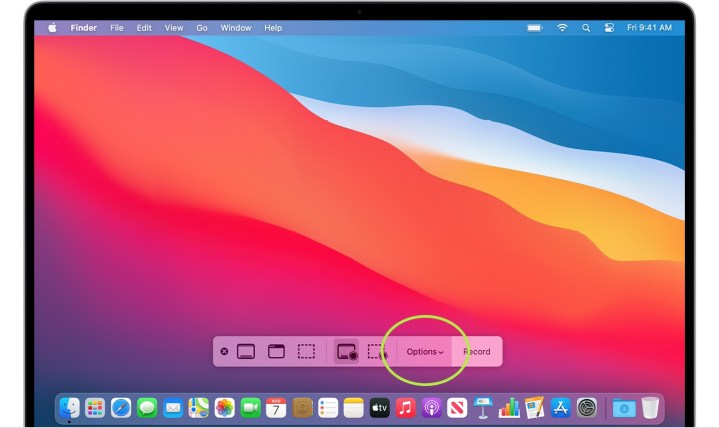
Step 3: At the highest of this new pop-up menu is a bit labeled Save To. Here you will note quite a lot of fashionable folders or apps it can save you the screenshot to, together with Documents, Clipboard, Mail, and Preview. If a kind of works for you, choose it.
Step 4: If you desire a devoted file for saving this explicit screenshot, choose Other Location as a substitute. This will help you decide or create a particular folder for storing these information. If you are taking frequent screenshots, we advise making a devoted folder for this function.
Step 5: For smaller screenshots, the *Command + Shift + 4 *possibility means that you can instantly drag a personalized screenshot window along with your cursor to seize no matter a part of the display screen you want. It’s very quick and a very good possibility for taking frequent screenshots. The drawback is that these screenshots are saved as particular person information in your desktop, so earlier than lengthy, they’re overlaying your total dwelling display screen and inflicting points.
Another possibility, is to make use of the Terminal.
Changing the place screenshots are saved on a Mac utilizing Terminal
You can use the Terminal to alter the situation the place screenshots are saved on a Mac, too. It’s a bit extra of an concerned course of, however comply with together with these steps and you will not run into any points.
Step 1: Head to your Terminal to sort out a few vital instructions. You can discover the Terminal within the Applications part in your Mac Dock, throughout the Utilities folder.

Step 2: With the terminal open, sort (or copy and paste) this command:
defaults write com.apple.screencapture location
Finish by urgent the spacebar. Don’t enter the command but!
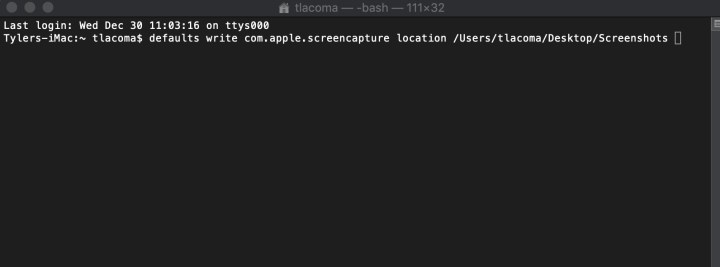
Step 3: You want to finish the command by specifying a correct folder vacation spot. You can sort this out, however it’s normally a lot simpler to search out the folder itself and drag it to the Terminal window. This will mechanically paste the folder location into the command for you (with out doing something to the folder).
As earlier than, we advocate making a folder in your desktop referred to as screenshots to make use of for this, however you possibly can drag any folder vacation spot you need. However, don’t drag a folder from the left-side Finder menu, as these are simply folder shortcuts that may be eliminated however gained’t give a useful vacation spot. Always use the folder itself.
Step 4: Press Enter. With the command right, Terminal ought to course of this with none errors. To end, paste within the following:
killall SystemUIServer
Press Enter once more. Your fast screenshots ought to now be saved to the folder of your alternative.
Handily, the Screenshot seize panel additionally seems to acknowledge this command. If you create and use a folder for these fast screenshots, it’ll additionally turn into the default save location for any screenshot mode you might use within the seize panel, including one other layer of usefulness.
Want extra ideas to enhance your Mac abilities? Here are our high tricks to make your MacBook even better.