How to alphabetize information in an Excel spreadsheet

Manually organizing information in Microsoft Excel is an actual ache. That’s why we do not suggest doing it. One easy job, studying how you can alphabetize in Excel, isn’t essentially as intuitive as we wish. Here’s how you can get issues sorted in a logical, alphabetical order.
Using the alphabetize buttons
The best technique to alphabetize in Excel is to make use of one of many simplified sorting buttons situated underneath the Data tab within the menu on the high of the spreadsheet. It is most helpful for once you wish to set up columns in alphabetical order. Continue on to learn in regards to the Sort command for a greater concept of how you can set up rows in Excel into alphabetical order.
Step 1: These buttons default to both an A-Z or a Z-A sorting order and may both kind a single column or kind a number of columns in a desk. In the latter case, the instrument defaults to sorting by the left-most column.
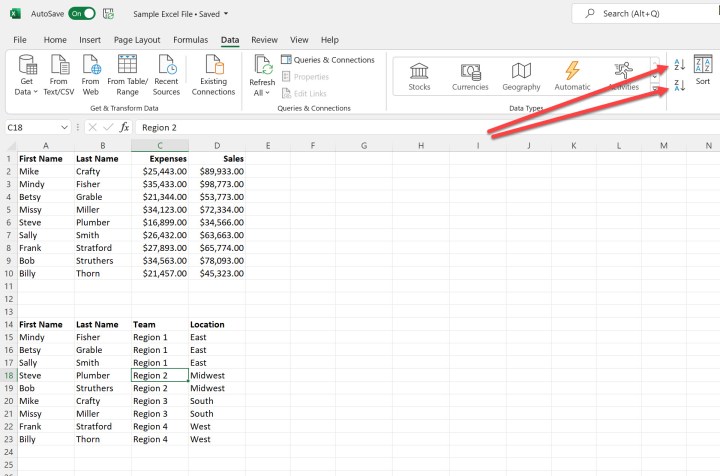
Step 2: To kind utilizing one of many buttons, choose your column or desk. In this case, we’re utilizing the second desk within the pattern spreadsheet.

Step 3: Click the A-Z button. This will alphabetize the desk by the contents of the First Name column. You may additionally kind in reverse order through the use of the Z-A button.

Alphabetize utilizing the Sort command
If you need extra management over how your information is alphabetized, use the Sort command. This will even mean you can alphabetize rows in Excel.
Step 1: Select your desk after which click on the Sort button. This will open the Sort dialog field. By default, the instrument will kind by the left-most column in A-to-Z order, and it’ll assume you might have information headers that needs to be used within the sorting course of. If you do not have headers, then deselect My information has headers.
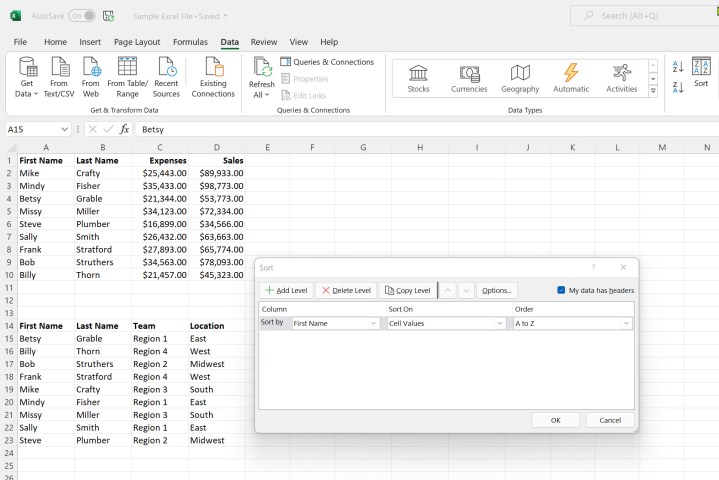
Step 2: Click the Options button. Here, you’ll be able to select whether or not your information is case delicate and whether or not to kind high to backside or left to proper.

Step 3: In our instance, we’ll kind by Location after which by Last Name. To achieve this, we’ll choose Location within the first Sort by drop-down field. Then, we’ll click on Add Level to pick Last Name from the drop-down field. You may use the Delete Level and Copy Level choices as mandatory.
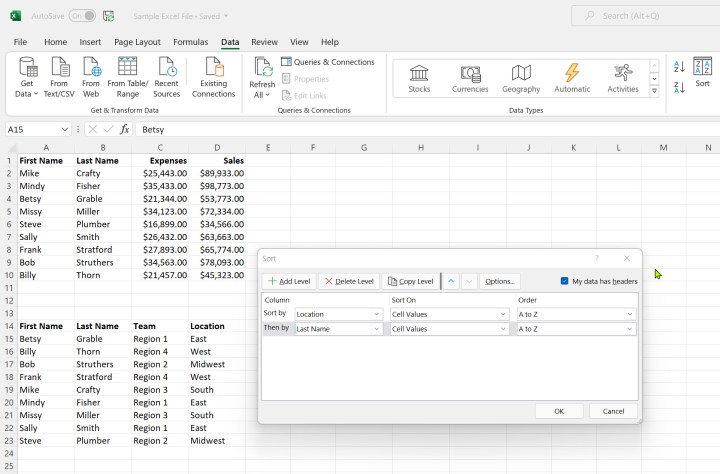
Step 4: Click OK when completed making your picks. Your information will now be sorted by Location first after which by Last Name.

For extra on how you can use Excel, take a look at our information on how to password protect an Excel file.