How to construct a desk of contents in Microsoft Word

Navigating by a Microsoft Word doc generally is a tedious activity for some. Assignments and contracts can result in many pages that may be onerous to maintain monitor of. One answer Microsoft affords for this can be a desk of contents. In addition to offering a top level view and normal overview of the content material, the function provides the doc a extra skilled look.
Here’s a information on tips on how to create a desk of contents in Microsoft Word.
Making a desk of contents in Microsoft Word is definitely fairly easy, however it seems that the short approach will not at all times provide the outcomes you need. Still, it’s price a attempt.
To shortly make a desk of contents in Microsoft Word select the “References” menu on the high of the window and choose “Table of Contents” from the dropdown menu. Then, select a method. A desk of contents to your current info will seem.
Not completely happy or see one thing lacking? Our extra in-depth information under will deal with all the extra complicated conditions you would possibly face.
Preparing headers
Before you insert the desk of contents, you have to to use heading kinds to the pages in your doc, which is able to then be utilized by Word to formulate the desk itself.
Step 1: Go to every web page of your doc and implement a heading type to the title through Home > Styles. You may also select to use subheadings that present additional context to a given web page. Heading 1, Heading 2, and Heading 3 are the alternatives you should utilize to format headings with the intention to populate the Automatic Table, which is essentially the most easy solution to create a desk of contents.
Step 2: Now use your cursor and click on the realm the place you wish to insert the desk of contents. The first web page is often an acceptable place for this. Click the References tab and choose the Table of Contents button.
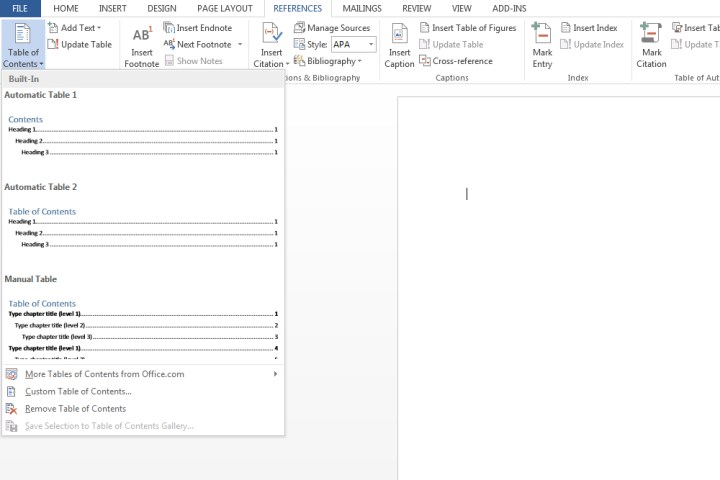
Step 3: Choose Automatic Table 1 (Contents) or Automatic Table 2 (Table of Contents), which is simply differentiated by the titles every setting will apply.
Microsoft Word will now depend on the headings utilized in step 1 to kind the desk of contents, which incorporates any textual content the place Heading 1, Heading 2, or Heading 3 was utilized to, in addition to the related web page quantity.
For reference, I utilized Heading 1, Heading 2, and Heading 3 for the primary three header titles proven under, which supplies a tiered look to the desk of contents.

Updating a desk of contents
Step 1: Select the desk of contents. Click the References tab after which choose Update Table.
Step 2: Choose from both:
Update web page numbers solely: This possibility will not replace any modifications made to the headings, however slightly simply the web page numbers.
Update complete desk: This will replace the desk with any heading-based textual content that has been modified, along with web page quantity modifications.
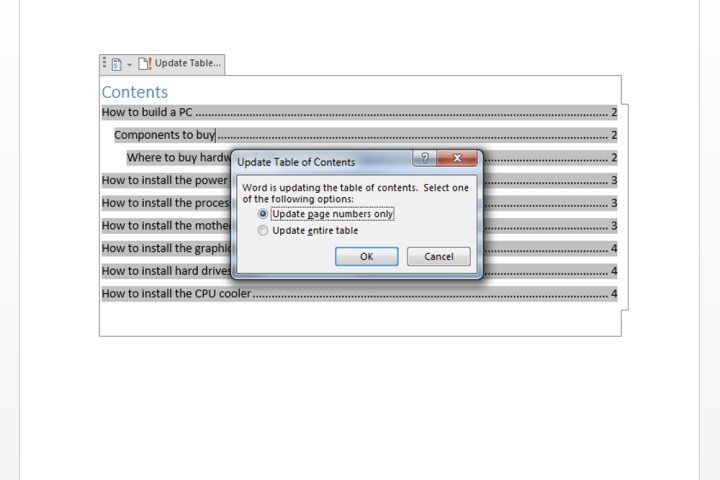
Table of contents customization
Not happy with how the desk of contents seems through the prevailing templates? Conveniently, there’s a solution to modify the look of your desk.
Step 1: Click your desk. Select the References tab, select Table of Contents, and click on the Custom Table of Contents.

Step 2: Within the window that popped up, you can also make numerous changes to the desk, together with what number of ranges to indicate, eradicating web page numbers, and alignment modifications. You may also open the Options button for additional customization. Click OK once you’re accomplished.

Step 3: If you wish to apply further formatting resembling altering the looks of the textual content throughout the desk, merely spotlight what you want to change throughout the desk, and modify the dimensions, colour, type, and so forth. These choices are situated throughout the Home tab.
Manually making a desk of contents
Your doc could also be arrange in a approach that will make populating an Automatic Table of Contents tough. As such, you’ll be able to decide to insert a handbook desk as a substitute.
Step 1: Click References, choose Table of Contents, and select Manual Table.
As its identify suggests, you’ll be required to make all the required edits resembling web page numbers. It can’t be up to date mechanically. You’ll must enter all of the related particulars your self.
Step 2: To additional customise the handbook desk, click on the desk of contents you created. Click the Custom Table of Contents area throughout the Table of Contents menu.

Removing a desk of contents
Click the desk itself, then choose the Table of Contents menu, and select the Remove Table of Contents possibility.
For extra helpful options you should utilize on Microsoft Word, take a look at 6 things you didn’t know you could possibly do in Microsoft Word.